If you’re looking to set up a network at home or in the office, understanding how to wire an RJ45 Ethernet cable is essential. This simple guide will walk you through the process, so you can get your network up and running in no time.
Whether you’re connecting your computer, printer, or gaming console to the internet, having a solid Ethernet cable is key. By learning how to wire an RJ45 cable yourself, you can customize the length and ensure a secure connection for all your devices.

Related Post 12 Volt Winch Wiring Diagram
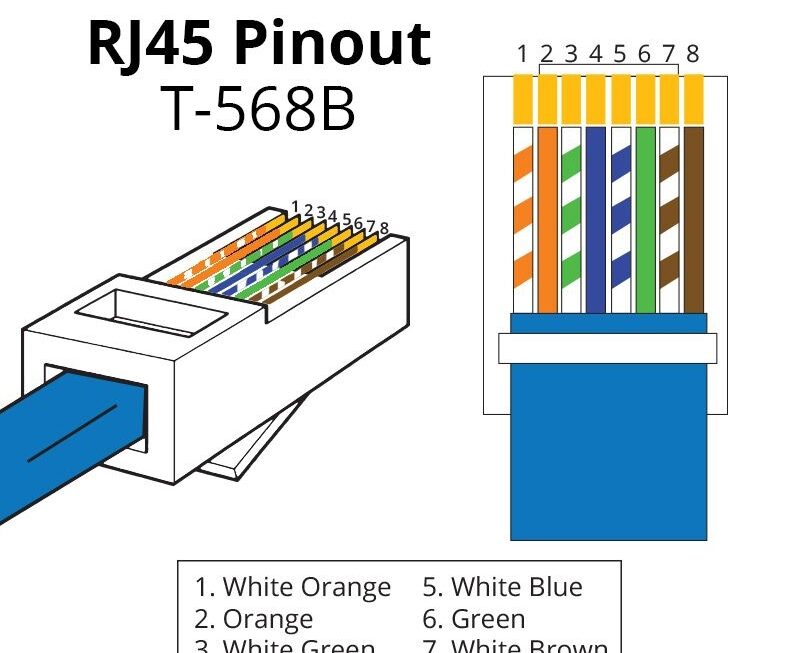
First, strip the outer jacket of the Ethernet cable to expose the inner wires. Next, carefully separate the twisted pairs and arrange them according to the wiring diagram for your specific network setup. Make sure to double-check the order before crimping the connector.
Once you have arranged the wires correctly, insert them into the RJ45 connector and use the crimping tool to secure them in place. Give the cable a gentle tug to ensure that the connection is secure, and you’re all set! You now have a custom-made Ethernet cable ready to use.
By following this simple wiring diagram, you can create as many custom Ethernet cables as you need for your network. Whether you’re setting up a home office or a gaming rig, having the ability to make your own cables will save you time and money in the long run.
So, next time you’re in need of a new Ethernet cable, consider making one yourself using this easy-to-follow wiring diagram. You’ll be amazed at how simple it is to create custom cables that meet your specific network requirements.
With this knowledge in hand, you’ll be able to tackle any networking project with confidence and ease. So, why wait? Start wiring your own RJ45 Ethernet cables today and take control of your network setup like a pro.
Download and Print Rj45 Ethernet Cable Wiring Diagram Listed below