Are you looking to upgrade your Toyota Tacoma stereo system but unsure about the wiring diagram? You’ve come to the right place! We’ve got all the information you need to make the process a breeze.
Whether you’re a car audio enthusiast or just looking to improve your daily commute, understanding the stereo wiring diagram for your Toyota Tacoma is essential. With the right knowledge, you can easily install a new system and enjoy high-quality sound on the go.

Related Post Spark Plug Wiring Diagram Chevy 350
Before you start the installation, make sure to gather all the necessary tools and equipment. You’ll need a wiring harness adapter, crimping tool, electrical tape, and a screwdriver. Once you have everything ready, follow the wiring diagram carefully to connect each component correctly.
Start by disconnecting the negative terminal of your car battery to prevent any electrical mishaps. Then, remove the old stereo system and locate the wiring harness behind it. Match the wire colors from the harness adapter to the corresponding wires on your new stereo unit, following the wiring diagram for guidance.
Once you’ve connected all the wires, secure them with crimp connectors and electrical tape to ensure a stable connection. Double-check your connections and test the stereo system before reassembling everything. With the right wiring diagram and a bit of patience, you’ll have a new and improved stereo system in no time!
In conclusion, upgrading your Toyota Tacoma stereo system is a rewarding experience that can enhance your driving pleasure. By following the correct wiring diagram and taking your time with the installation process, you can enjoy high-quality audio on the road. So, what are you waiting for? Get started on your stereo upgrade today!
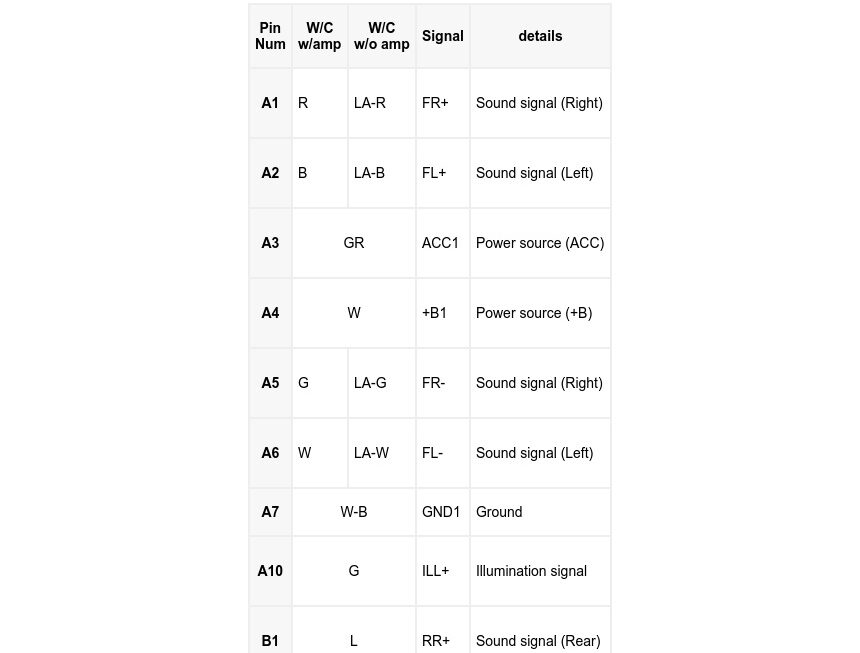
Download and Print Toyota Tacoma Stereo Wiring Diagram Listed below