If you’re looking to upgrade your car audio system, adding a capacitor can help improve sound quality and prevent voltage drops. However, it’s important to have the right wiring diagram for your car audio capacitor to ensure proper installation.
Before diving into the installation process, make sure you have all the necessary tools and materials on hand. This includes the capacitor, wiring kit, and of course, the correct wiring diagram for your specific car audio setup.

Related Post Bridged 4 Channel Amp Wiring Diagram
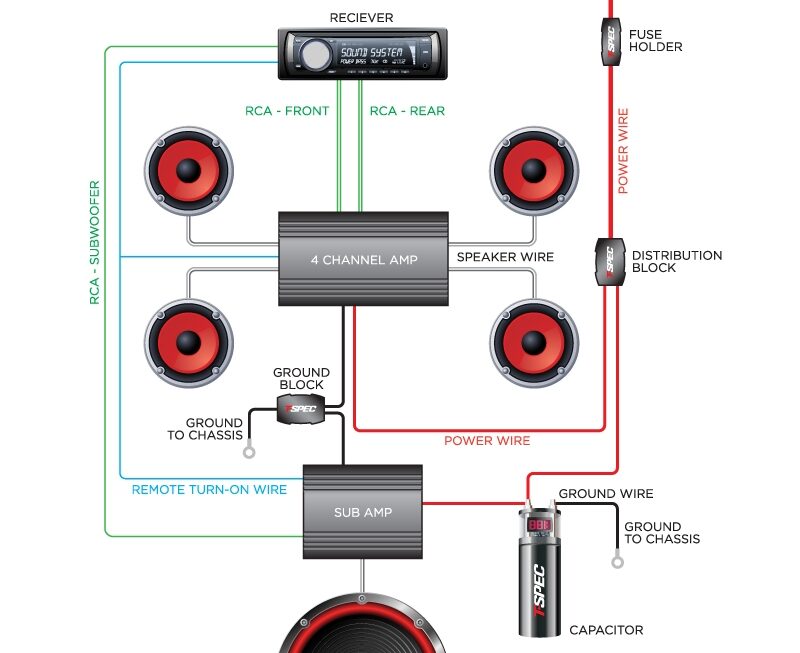
Start by disconnecting the negative terminal of your car battery to prevent any electrical mishaps. Then, locate a suitable mounting location for the capacitor near your amplifier. Make sure to secure it properly to prevent any vibrations while driving.
Next, refer to the wiring diagram to connect the positive terminal of the capacitor to the amplifier’s power wire. The negative terminal should be grounded to the vehicle’s chassis to complete the circuit.
Once everything is properly connected, double-check your wiring to ensure there are no loose connections or exposed wires. Reconnect the negative terminal of the car battery and test your audio system to see the difference the capacitor makes in sound quality.
Remember, having the right wiring diagram for your car audio capacitor is crucial for a successful installation. If you’re unsure about any step of the process, don’t hesitate to seek professional help to avoid any potential damage to your vehicle’s electrical system.
By following the correct wiring diagram and taking the necessary precautions, you can enjoy an enhanced audio experience in your car with the help of a capacitor. So, take your time, follow the instructions, and soon you’ll be cruising down the road with a top-notch sound system.
Download and Print Wiring Diagram For Car Audio Capacitor Listed below